by Tom Gaylord
Writing as B.B. Pelletier
Here is a unique guest blog. Remember that readers are always welcome to write a report for this blog.
Today’s report is the first part of a guest blog from reader Benji-don. He shares his experiences with an Apache-Fire-Ball-Texan multi-pump pneumatic air rifle that his son brought to him to fix.
If you’d like to write a guest post for this blog, please email me. Over to you, Benji-don.
Apache-Fire-Ball-Texan: Part 1
by Benji-don
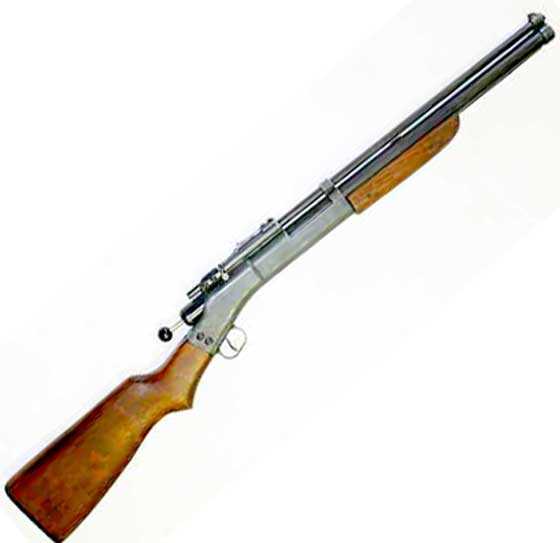
Apache-Fire-Ball-Texan multi-pump pneumatic air rifle.
This report covers:
- Description
- Where it came from
- Is it worth fixing?
- Where to start?
- Time to put it back together
- Missing parts
- Exploded View
- Parts List
- How it works
- Summary
- Editor’s note
Description
The Apache-Fire-Ball-Texan I have is an early single shot version. Apache airguns were only made in 1948 and 1949 in Southern California. Overall length is 36.5-inches and the barrel is 20.5-inches. The best I can measure, the twist in the rifling is one turn in 16- to one turn in 18-inches, or maybe a little more. The rifling is so shallow I can not get it to grip a tight patch on a cleaning rod. Since it was made to shoot round balls, it could be slower than one turn in sixteen inches.
The stock wood looks like walnut to me. My rifle weighs 5 lbs. 15 oz. It is a multi-pump .24-caliber air rifle that also has a smoothbore barrel insert to shoot BBs. It is all-metal and wood except for the seals and the plastic butt plate. The barrel insert is also steel and screws into the muzzle end of the barrel. The breech and barrel band are made of pot metal. The Blue Book of Airguns has a more thorough description of the company and their history.
Where it came from
My son Andy picked this air rifle out of the garbage at his friend’s house. I think it belonged to his friend’s grandfather.
Andy brings things over for me to fix up every once in a while. He brought over an old 1928 Caterpillar Twenty tractor about a year ago, I told him, “No!” on that one. It’s still in the driveway though. I have three old tractors I am still using that need repairs. [Editor: We need to find out how I can get that Caterpillar 20 from you. It’s a very historic and valuable California tractor!]
Is it worth fixing?
This air rifle looked like it came out of the garbage. The front sight blade was broken. The back notch sight was missing. The breech bolt handle was broken. The hammer cocking rod and knob were missing. There was house paint splatter all over the gun and there were vise jaw marks on the receiver and the barrel band/pump pivot bracket. And there was no back-pressure when pumping. The gun did not look like anything worth fixing, and it was ugly. There was a wood stock and forearm though.
There were no identifying marks on the gun anywhere. Initially I thought it was a Crosman 100-series pellet rifle. Then I made the mistake of looking in the Blue Book of Air Guns and discovered that it was really a .24 caliber Apache-Fire-Ball-Texan single shot, and it had a barrel insert to shoot BBs. I became curious and decided to take it apart to see how it worked. Soon the situation came down to either the gun or me. I was not going to stop until I found out what was inside.
Where to start?
I removed the front pump pivot pin along with the front barrel band/pump pivot bracket. The pump assembly came right out. I was surprised to see a brass cone inside the pump cup seal. Maybe I would get lucky, I could tighten up the cone against the pump cup until it expanded the seal into the compression tube. That was a good design feature. After removing and cleaning the pump assembly I soaked the pump cup in automotive transmission sealer. By trial and error the brass cone could be tightened against the cup until there was a good seal. I put a few drops of Pellgun oil in the compression tube and put the pump back together. With every pump there was air coming out of the barrel. I let it soak overnight with some more oil. The next day was no better. Now I had to decide if it was worth spending more time on the Apache.
I worked on taking the hammer spring retainer off for a couple of hours. King Kong had installed with a pipe wrench! I could see the jaw marks. I put the breech block in my vise (with padded jaws), and resorted to using a pipe wrench myself, because a strap wrench did not provide sufficient grip. It worked, and now there are some more marks.
To get the exhaust valve body lock nut off I had to build a tool to fit over the valve stem guide. An old 5/8” socket fit over the valve stem guide. I ground down each side on the open end — leaving two blades, one on on each side, to engage the lock nut. Once the lock nut was off I could not see any way to get the valve out. Then I found a setscrew holding the valve body that is accessed through a hole in the bottom of the breech block.
I decided to look on the web, to see if there were any parts diagrams. There were none I could find. I did find a picture on JG Airguns by John Groenewold, of a disassembled Apache pistol that helped some. I also read that the exhaust valve body had to be pushed out using a dowel through the check valve port. It is not threaded like the Benjamin/Crosman valves, so it can easily be pulled out. There were some hints online that the compression chamber and valves could be driven out the breech with a dowel in the compression tube. I am pretty sure the compression chamber in my Apache rifle is soldered in place.
After a couple of days soaking the valve in penetrating oil there was still no movement. It was time to get tough again. I put a 3/16 dowel against the check valve stem and gave it a good whack with a hammer, it did not move. Next I gave it a good blast with a propane torch and still could not move it with a gentle push. Ok — grab the hammer again. Parts went flying in all directions! It is scary looking for parts in a workshop full of junk when you don’t know what parts you are looking for. I found a spring, exhaust valve, check valve and the valve body.
Well, now it was getting interesting. There were a couple of #8 birdshot inside the valve body. Earlier I had found a .177 pellet stuck in the exhaust port. I cleaned up all the dirt and gunk, and then soaked the exhaust valve in transmission leak stop. When I put it all back together it still leaked out the barrel and who knows where else.
Time to put it back together
The check valve was a brass disc with a small rod that fit through the intake hole in the compression chamber. There was no seal material on the check valve. The compression chamber is also brass, so how was this supposed to work? I had a seal from the paintball shop that would fit over the rod on the check valve but the surface of the compression chamber was pitted and looked corroded.
I cut off a piece of ½ inch dowel and screwed a piece of all-thread into one end to attach a drill. Once on the drill, I sanded down the dowel until it just fit inside the compression chamber. I glued emery cloth on the other end of the dowel and tried to polish the check valve seat of the compression chamber. It turned out that the check valve seal was stuck to the compression chamber. I tore it out with the modified socket I used to loosen the valve body lock nut. I was then able to polish the check valve seat with the emery paper on the end of the dowel. After reassembly the valve was still leaking.
I forgot to remove the set screw on disassembly and ruined the check valve trying to get the valve body off with a dowel and hammer. Not the first time I have screwed up! Now I needed a new check valve. I cut the stem off a Benjamin 342 exhaust valve and chamfered the hole in the compression chamber to fit the new valve stem shoulder. Next I put the exhaust valve in a drill press and polished the seal with 800 grit sand paper. Then did the same for the valve body exhaust valve seat face. After tinkering with the valve parts quite a few times I was finally able to get it to seal and not leak. I pumped it up and let it leak off quite a few times before I was able to get it hold air. Now I leave four pumps in it and it seems to be ok.
Below is a picture of the dowel with emery cloth on the end to polish the inlet/check valve seat, and the socket I cut to fit the valve lock nut.
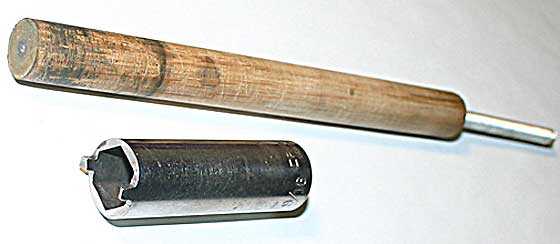
Dowel with emery cloth on the end to polish intake valve seat and shaped socket for valve body lock nut.
Missing parts
I replaced the broken bolt handle with a machine screw. The front sight is a piece of common steel washer material trimmed and JB-Welded to the pot metal barrel band. A rear sight from a Benjamin Model 342 fit the machine screw locations from the original sight. I used a plastic knob from the hardware store and a bolt that fit the threads in the hammer. I cut the bolt to what was a useable length and cut threads on the other end to fit the knob.
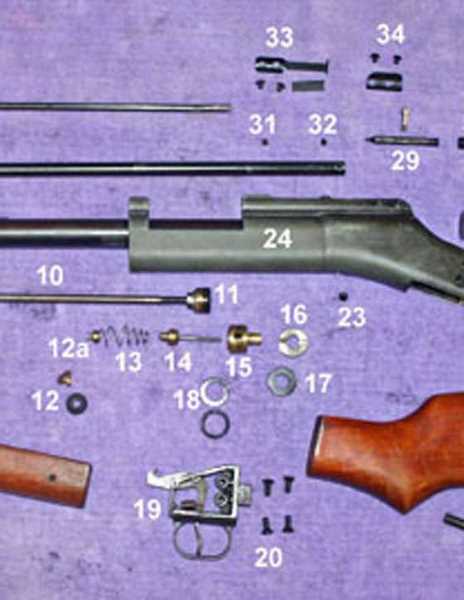
Exploded view
Below is an exploded view picture (actually three overlapping images) with the old and some new parts.
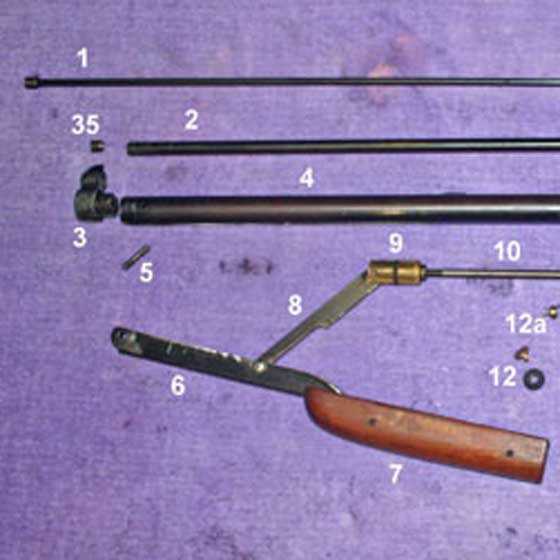
I cut the parts picture into three images that overlap, so you can see the parts better — Ed.
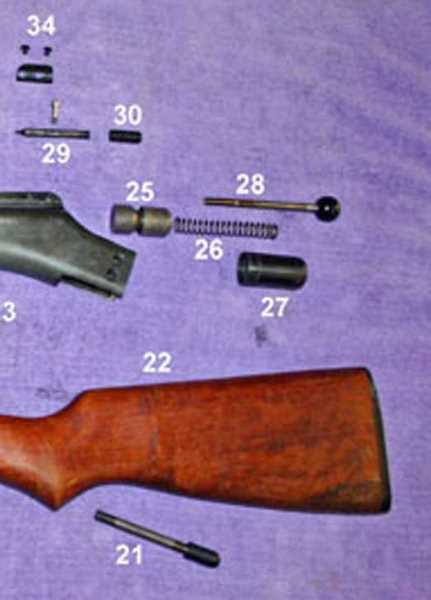
Parts List
1. Insert barrel .175 cal.
2. Barrel rifled .24 cal.
3. Barrel band, compression tube plug, front sight
4. Compression tube
5. Pump pivot pin
6. Pump lever
7. Pump lever handle – fore stock
8. Pump lever link
9. Plunger guide and felt washer
10. Pump rod
11. Pump head and pump cup
12. Inlet valve and seal – original
12a. Inlet valve from Crosman 342 exhaust valve (stem trimmed)
13. Valve spring
14. exhaust valve
15. Valve body
16. Valve body lock nut
17. Valve body gasket between valve body and lock nut
18. Valve body gasket between valve body and compression chamber
(old top new o-ring bottom)
19. Trigger assembly
20. Trigger assembly screws
21. Stock stud and cap nut (screws into trigger assembly)
22. Stock
23. Valve body set screw (also alignment pin)
24. Breech block
25. Hammer
26. Hammer spring
27. Hammer sleeve
28. Hammer cocking stud and knob
29. Breech bolt and handle
30. Breech bolt sleeve
31. Barrel set screw (also alignment pin)
32. Barrel set screw
33. Rear sight (from Benjamin 342) and screws
34. Bolt lock cam and screws
* Compression chamber not shown
How it works
Before we get to the testing, let me tell you about some of the features of the Apache Fireball Texan. It does not have a safety but does not need one. The way the trigger and hammer interact is very clever. The gun has a half cock that allows the exhaust valve to seat so the gun can be pumped up. Half cock also locks the trigger under a lip inside the hammer. If the gun is bumped, the hammer knob is hit, or the trigger is pulled the gun will not fire when on half cock.
The bolt does not cock the hammer. The hammer is cocked using the knob attached to the hammer with a stud/bolt. To load the gun the bolt must be used. The knob is used to cock the hammer. Not a very efficient process. [Ed. That was a common way for single-shot air rifles to work at that time.]
The hammer, stud, and knob assembly make for a heavy mass striking the exhaust valve stem. Although heavy, it does not seem to give much kick when shooting the gun.
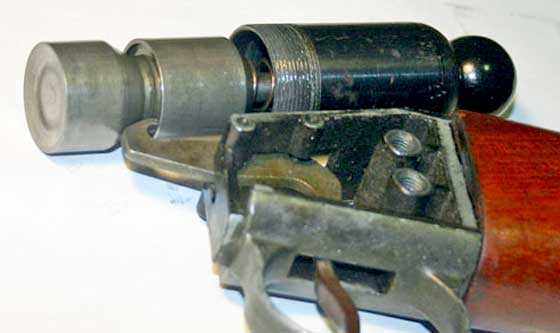
This shows the trigger sear locked in the hammer when on half cock.
Summary
After almost a year of off and on work, the Apache – Fire-Ball – Texan air rifle no longer looks as ugly to me. I guess all this time has given me a little bit of affection for the gal. Maybe not enough to hang in the living room but it does start a conversation when I bring it out.
In the next report I will do some velocity and accuracy tests.
Editor’s comment
This was a fascinating look at the insides of an air rifle few have ever seen. I’ve seen them at airgun shows, but this is my first time to look inside. Thank you, Benji-don.