by Tom Gaylord
Writing as B.B. Pelletier
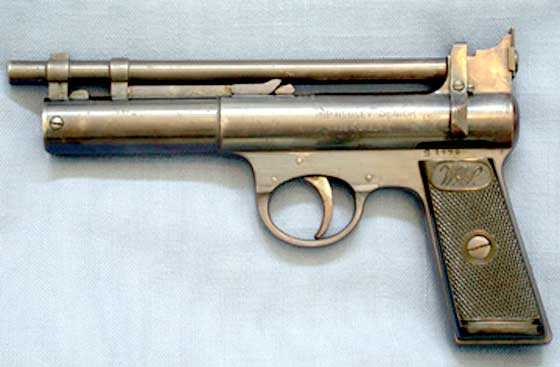
Webley Senior straight grip air pistol.
This report covers:
- Pictures
- Start
- Remove the end cap
- Remove the piston
- The piston
- What now?
- Summary
Today we look inside the Webley Senior air pistol. Let’s get to it!
Pictures
There are a lot of pictures in this report and I didn’t spend much time cleaning them up. They show the details that are important, plus there was one unexpected lesson in photography you will soon see.
Start
We start with the pistol uncocked and unloaded. I first photographed it on a black background that made the dark black gun appear to be silver. So for the first photo of the pistol, I jaid it on a white paper towel, which got it looking dark again.

Start with the gun unloaded and uncocked.
Remove the end cap
The first step is to remove the end cap. There are several minor steps involved. First remove the short locking screw on the left side of the gun and the long pivot screw on the right side.

Two screws are removed from the end cap. The bottom screw is on the left side of the gun and comes out first. It threads into the top screw, which is the pivot for the cocking link. Notice the dark gun is now silver against the dark background.
Now release the barrel at the breech. It has to be free for what comes next.

Release the barrel at the breech, as if cocking the pistol.
Now it’s time to lift the barrel lug up out of the end cap. It is very tight, but not an interference fit. It will come out. I use the barrel as a lever and insert a screwdriver shank between the barrel and the gun to lever the lug out. You’ll see what to do if you ever disassemble one of these pistols.

The barrel lug has been pried up out of the end cap. Notice the cocking linkage is still attached to the pistol at the rear.
The lug is out but the barrel isn’t free until you detach the cocking linkage from the pistol. Slide the link backwards towards the breech and it will stop at the disassembly hole. Pull it out and the barrel is free of the gun.

Slide the cocking link to the rear to remove it from the gun.

The barrel is free of the pistol.
Now we turn our attention to the end cap. The end cap is threaded, and on a pistol that has not been apart much, it will be very hard to turn. I put something to act as a large screwdriver in the jaws of a vise and I turn the pistol with my hands. The “screwdriver” remains stationary in the end cap slot while I turn the pistol.
After the first disassembly years ago I put grease on the end cap threads so they would always come out easily. I still use the “screwdriver” because the end cap slot is quite wide. A regular screwdriver would just mar it. I cut off one end of an open-end wrench and use the flat section as my “screwdriver.”

The slot in the end cap where the barrel lug was located is very large. A regular screwdriver would just mar it.

I use the cut-off end of a wrench as a wide screwdriver. Tighten it in a vise. When it’s in the end cap, slot,turn the gun with your hand. Once it is free I start it turning with the pliers. Notice that when the gun is back on the white paper towel, it is dark again.
Now I unscrew the end cap from the gun. I do this by hand, knowing that the mainspring will push the cap about two inches out of the tube when the cap is free. It’s a stout push that you need to be ready for. This would be very difficult to do in a mainspring compressor, but you need to know that spring has a lot of force!

The end cap has been turned all the way out. This is how far the mainspring sticks out when it is not restrained by the end cap.
As you can see, the mainspring and inside of the powerplant are still well-greased. I used surplus military grease that was made to lubricate an M1 Garand, but regular white lithium grease works fine for this. It doesn’t dry out over time. This pistol has been lubricated this way for over 30 years!
Now you can pull the end cap out of the gun. The mainspring should come with it. You will see that the spring guide is a part of the end cap.
Look at the mainspring. Is it reasonably straight or does it have one or more prominent bends? A bent mainspring should be replaced, and they are available from the British parts houses like T.R. Robb and John Knibbs. A new one doesn’t cost much and will change the performance of your pistol noticeably. The spring in my gun has been in there over 30 years and still looks pretty good, because I don’t shoot the gun that much.

The mainspring looks straight. Now you see that the end cap is also the spring guide.
Remove the piston
That entire procedure was just to remove the end cap. It’s a lot of small steps, but each one is straightforward and not too technical. If you follow my instructions, you should be able to do the same with not just a Webley Senior, but also a Mark I and Mark II, and a Premier Mark I and II. Even the Tempest, Typhoon and Hurricane are pretty much the same, with some modern touches added for lower production costs. All Webley spring pistols are constructed in a similar way.
The next step is actually the final one. The piston has to be removed from the gun.

Looking through the cocking slot, you can see the bottom end of the piston.
I will tell you now that the piston will be tight inside your gun. There are two steps to removing the piston. Step one is to use a screwdriver through the cocking slot to push the piston out of the gun. There are many machined surfaces on the piston for the screwdriver to grab. When you get it as far as it will go you have to move to the front and place the screwdriver against other piston surfaces to completely remove the piston from the pistol. The piston is a hollow tube with all its connections to the air pistol machined around the outside, so there are several places to pry on.
The piston will slide a little way then stop on the sear. You have to pull the trigger while sliding the piston to get it past the sear.
It does slide all the way out, and when you put it back you will lubricate the outside with lithium grease thoroughly so there will never again be a problem removing it from the pistol.
The piston
Once the piston is out, you can examine it. Note that there are circular rings at the front and rear that keep the piston aligned with the inside of the spring tube/compression chamber. Most spring-piston airgun pistons have similar design, but few are as sharp and obvious as those on the Webley piston.
You will also be able to see the piston ring when the piston is out of the gun. If it needs replacing, you should be able to see some flaw like a break or a bend. Don’t just replace it for no reason, because these things don’t wear out. The one on my pistol is at least 40 years old and I would not be surprised to learn that it’s original to the gun.

With the piston out of the gun you can see the piston ring (arrow). Notice, also, the rings around the piston (two arrows), front and rear, that guide it inside the spring tube.
What now?
Now that the pistol is disassembled this far, it’s time to clean all the parts and lubricate them as described in this report. Then the gun goes back together in the reverse of how it came apart. There are a few tips you should know.
First — now is when you lubricate all the parts. Use white lithium grease and nothing else, unless you know for a fact it’s better. You can grease the inside of the spring tube/compression chamber, but I find the piston does that when it’s installed. I don’t bother doing it separately.
Second — the piston doesn’t want to go back into the pistol. The piston ring may need to be compressed to get it in the gun. Do this with your fingers, and it should slide into the gun.
Third — when the head of the piston encounters the sear it will stop. You must pull the trigger to get the piston to slide all the way in. Remember that the fit is tight. It will go in, and the lubrication will help you.
Fourth — when you put the end cap back you have to cup it in your hand and be prepared to push against the spring until it encounters the threads. This may take some trying before things line up. Screw it in at least one turn before releasing to adjust your grip to turn it some more, and don’t leave it hanging by a thread! After it is a couple threads in you can use your “screwdriver” to turn it in farther.
Summary
It took me about 45 minutes to disassemble the pistol. That included taking the pictures. I expect the first time you disassemble a Webley pistol it will take a similar amount of time, though once you have lubed it, it should come apart in 15 minutes.
We also learned that you can make airguns appear lighter or darker in photographs, depending on the background they are placed on. Flash doesn’t bring up the details. Flash often turns a dark gun into a black silhouette. Use a tripod and let the camera’s brain figure out the exposure.